> For the complete documentation index, see [llms.txt](https://docs.swiftproxy.net/llms.txt). Markdown versions of documentation pages are available by appending `.md` to page URLs; this page is available as [Markdown](https://docs.swiftproxy.net/proxies/integration-and-usage/residential-proxies-integration/octobrowser.md).
# OctoBrowser
## **Why choose OctoBrowser?**
The main reasons for choosing Octo Browser are as follows:
**Advanced multi-account management and anti-detection technology**:\
Octo Browser allows you to create and manage thousands of isolated browser profiles on a single device. Each profile has a unique, realistic digital fingerprint, significantly reducing the risk of account bans or linkage across platforms.
**Efficient team collaboration and automation features**:\
It offers flexible team role management, label-based profile access control, and detailed activity logs. Additionally, Octo supports full API access, enabling automation of profile creation, usage, and deletion with your preferred programming language.
**Strong data security and privacy protection**:\
Octo Browser uses multiple layers of encryption to protect sensitive data—user passwords, database keys, and profile credentials. With added features like two-factor authentication and password-protected profiles, your data stays safe even in shared environments.
Overall, Octo Browser stands out for its robust anti-detection capabilities, powerful automation, and enterprise-grade security—making it ideal for digital marketers, e-commerce sellers, and anyone managing multiple online identities.
## **How to configure OctoBrowser with Swiftproxy Residential Proxy?**
### **Step 1: Get Proxy Information and Download**
1. Download OctoBrowser from the [official website](https://octobrowser.net/download/).
2. Visit the Swiftproxy website to get your proxy IPs.
* [**API Acquisition**](/proxies/residential-proxies/get-proxy/api-acquisition.md)
* [**Username and Password Authentication**](/proxies/residential-proxies/get-proxy/user-and-password-verification.md)
### **Step 2: Configure Swiftproxy in OctoBrowser**
1. Open OctoBrowser for the first time, log in, and click "Proxy" and then click “Add Proxy".
2. Enter the proxy settings page, and paste the proxy string we copied from Swiftproxy dashboard, click "check proxy", if it works, click "confirm" in the end.\
**Note**: You can find the required proxy details in **Step 1.**
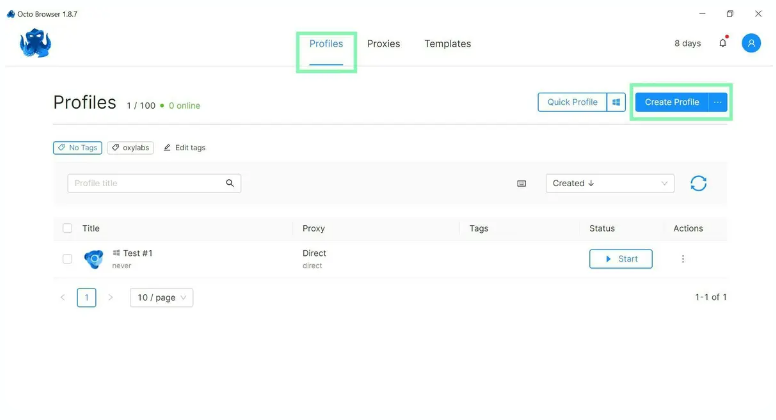
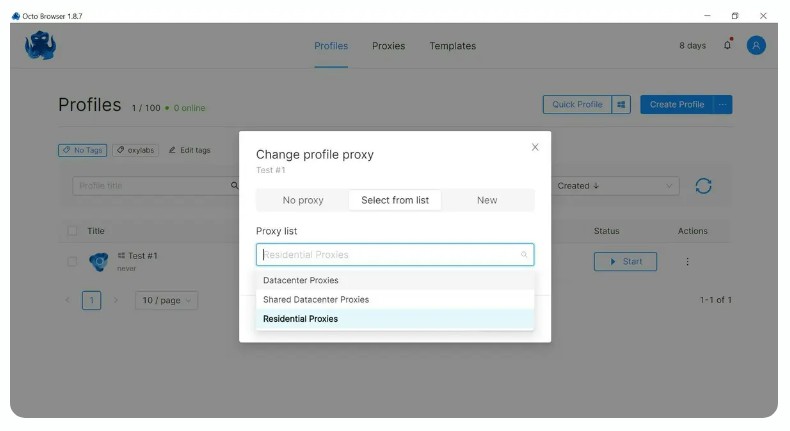
3. Go to Profiles and click "Create Profile" and set up a new profile.
4. Once set up, add a proxy from your pre-configured list. You can do this by either selecting the Proxy section within your profile or navigating to the Connections tab while editing the profile.
5. Your profile is all set with a proxy!
---
# Agent Instructions
This documentation is published with GitBook. GitBook is the documentation platform designed so that both humans and AI agents can read, navigate, and reason over technical content effectively. Learn more at gitbook.com.
## Querying This Documentation
If you need additional information that is not directly available in this page, you can query the documentation dynamically by asking a question.
Perform an HTTP GET request on the current page URL with the `ask` query parameter:
```
GET https://docs.swiftproxy.net/proxies/integration-and-usage/residential-proxies-integration/octobrowser.md?ask=
```
The question should be specific, self-contained, and written in natural language.
The response will contain a direct answer to the question and relevant excerpts and sources from the documentation.
Use this mechanism when the answer is not explicitly present in the current page, you need clarification or additional context, or you want to retrieve related documentation sections.